
Have a working Flask app you want to deploy to Heroku? Read on to learn how…

A few weeks ago I had a couple of Flask apps that I wanted to deploy to Heroku. My apps ran fine locally so I expected the process to be quite simple with Heroku’s ability to deploy directly from a GitHub repository. While I eventually got both of my apps up and running, I thought the resources I found were a bit too dense for the relatively straightforward process I used to get everything set up. I’m hoping this blog post helps someone in a similar position get their work deployed more quickly than I did. You can follow along as I explain each step or just scroll down for the abridged version at the bottom of this post.
1. Push Your App to a GitHub Repository
This step isn’t completely necessary since you can deploy using a combination of Git and the Heroku CLI, but I would definitely recommend just linking a GitHub repo because it’s much easier. If you aren’t sure how to get your local files into a GitHub repo, check out this guide by Karl Broman. Once you have your app in its own GitHub repository and you’ve confirmed that it runs locally you should be ready for the next step.
2. Set Up a Virtual Environment
Before we start creating the files Heroku needs to properly deploy your app we’re going to set up a virtual environment for your app. You don’t actually have to follow this step but I highly recommend doing it to avoid the messy alternative. That said, if you don’t want to use a virtual environment, feel free to skip ahead to section 3.
So why a virtual environment?
- A virtual environment allows you to keep specific versions of libraries installed for app development and testing while still allowing you to update everything to the newest version outside of that environment. This is especially handy if you’re using a package management system like Conda that encourages you to update all packages simultaneously.
- Having a virtual environment for your app makes it easy to get a list of the packages it requires to run, which is exactly what we’ll do in the next step.
Follow this guide from Real Python to set up your virtual environment and make sure it’s running for the remaining steps. If you try to run your app it should fail because your newly-created virtual environment doesn’t have Flask or any of the other Python libraries your app is using installed yet.
ModuleNotFoundError: No module named 'flask'So in order to make your app functional again, you’ll have to install all necessary packages in the virtual environment using pip. For Flask the shell command looks like this:
(env) $ pip install flaskOnce you can launch your app locally from the virtual environment you should be ready for the next step.
3. Install and Test Gunicorn
Regardless of whether or not you created a virtual environment, you’ll need to use Gunicorn to get your app to run properly on Heroku. Flask’s built-in web server cannot handle concurrent requests, but Gunicorn can. For a much better, in-depth explanation check out this Heroku article. What you want to do now is install Gunicorn and make sure you can run your app with it. Let’s first install it:
(env) $ pip install gunicornAnd now navigate to the directory containing your Flask app and let’s make sure it works with Gunicorn. The command below will run the function app from the file app.py contained in the current working directory using Gunicorn. You may need to change the command slightly based on what you named things; just follow this format: gunicorn (your file):(your function).
(env) $ gunicorn app:appYou should see a message telling you that Gunicorn is running and a local address you can open in a web browser. All app functionality should be the same as if you ran it through Flask’s built-in web server.
If your Flask app script is not in the root directory of your GitHub repository, you’ll also want to test a modified version of this command. We’ll be telling Heroku to use Gunicorn to run your app, but it does that from the root directory. So let’s navigate to the repo root directory and test Gunicorn again (if your app script is in the root directory you can just skip this part). The command below uses the –pythonpath flag so Gunicorn can find my app file in a subdirectory. Follow this format for your own file hierarchy: gunicorn –pythonpath (app directory) (your file):(your function).
(env) $ gunicorn --pythonpath flask app:appIf everything works properly, you’re ready to create the three files Heroku needs!
4. Add ‘Procfile’ to Your Repository
The Procfile is what Heroku uses to launch your app and should be easy to create because we just figured out what needs to be in it in the last step. All you have to do now is put web: in front of the Gunicorn command you ran from the root directory of your repository and save that in a plain text file called Procfile in your repo root. My Procfile looks like this:
web: gunicorn --pythonpath flask app:appThat’s it. Just follow the pattern web: gunicorn –pythonpath (app directory) (your file):(your function) and save it in Procfile.
5. Add ‘runtime.txt’ to Your Repository
Next we’ll create runtime.txt, which tells Heroku what version of Python you want to use to run your app. You can get your Python version through the command line by running this line:
(env) $ Python -VYou should see output that looks something like this:
Python 3.7.3Now all you have to do is properly format the Python version and save it in a plain text file called runtime.txt in the root directory of the repo. For the version above the file contents should look like this:
python-3.7.3Before deploying you should also check the Heroku Dev Center to confirm that you’re specifying a supported version of Python.
6. Add ‘requirements.txt’ to Your Repository
The last file we need to create is requirements.txt, which tells Heroku exactly what Python libraries your app is dependent upon. Did you set up that virtual environment in Step 2? If you did, congratulations, this step is going to be really simple. Make sure your virtual environment is still activated and run the command below to write a list of the libraries your code needs to run into requirements.txt.
(env) $ pip freeze > requirements.txtYou can also run pip freeze by itself to get the list of libraries without creating the requirements.txt file. If you set up a virtual environment, the list should be pretty short because that environment contains only the libraries your app needs to run. If you didn’t use a virtual environment your list will contain every Python library pip has installed on your machine, which is likely way more than you need just to run your app. You can whittle down that list by manually deleting items from requirements.txt, but that is definitely not a best practice. It’ll work, but I highly recommend using a virtual environment instead.
7. Push Your New Files to GitHub
Once you have Procfile, runtime.txt, and requirements.txt saved locally in your app’s root directory you’ll want to commit and push them to your GitHub repository. Since you’ll be connecting the GitHub repo for the app to Heroku for deployment, all necessary files need to be in your online repository.
8. Connect Your GitHub Repo to a Heroku Project
You’ll need to first create a Heroku account if you don’t already have one and then create a new app through the Heroku web interface. I won’t detail how to do either of those things here because Heroku’s interface makes it very simple. Once you’ve created your app you should see a section called Deployment Method under the Deploy tab: Click Connect to GitHub.

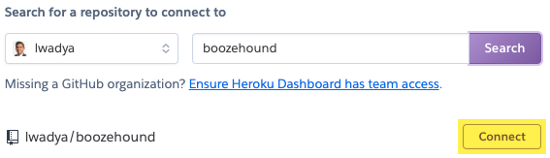
Once you give Heroku permission to access your GitHub account you’ll be able to search for your app repository and then connect to it.
9. Deploy Your App
With your repository connected you should now be able to deploy it under the Manual Deploy section. Just select what branch you want to use and click Deploy Branch. There’s also an option for automatic deployment which will deploy a new version of your app on Heroku every time you push to the deployed branch on GitHub.
You can check the results of your build under the Activity tab: if everything worked you should see Build succeeded after your latest build attempt. If you see Build failed check the build log to see what went wrong. I’ve found googling the exact error message from the logs to be very helpful when I’m not sure how to fix a failed build.
You may also run into a situation where your build succeeds but does not run properly or at all. Because the build was successful, you won’t find any error messages in the build log and will instead have to view the Application Logs. Click the More dropdown menu in the upper right corner of the Heroku dashboard and select View Logs to access them.
Googling error messages will again come in handy when troubleshooting activity logs. I was having trouble getting an app that uses OpenCV to run despite a successful build and was able to quickly resolve my problem thanks to a search turning up this StackOverflow thread.
Thanks for Reading!
Hopefully you’ve now successfully deployed your Flask app to Heroku. If it didn’t work for you, please let me know what or where things went wrong so I can make improvements to this post. If you want to dig deeper into Heroku, a good place to start is the well-organized Heroku Dev Center. Thanks for reading and happy Heroku deploying!
TL;DR
Here’s how to deploy a Flask app on Heroku:
- Push your working Flask app to a GitHub repository
- Set up a virtual environment and install all library dependencies
- Install and test Gunicorn locally
gunicorn --pythonpath (app directory) (file name):(function name) - Add ‘Procfile’
web: gunicorn --pythonpath (app directory) (file name):(function name) - Add ‘runtime.txt’
Python -V - Add ‘requirements.txt’
pip freeze > requirements.txt - Push new files to the GitHub repository
- Connect GitHub repository to Heroku and deploy
- Deploy your app